Wordpress and google analytics

Google Analytics GA4 – Fix Thresholding Applied and get granular refferal source data

The Issue

Moving over to the new Google Analytics GA4 from UA, has caused me a few issues, mainly I wasn’t able to get granular source data from my referrals, which websites were users hitting my site from.

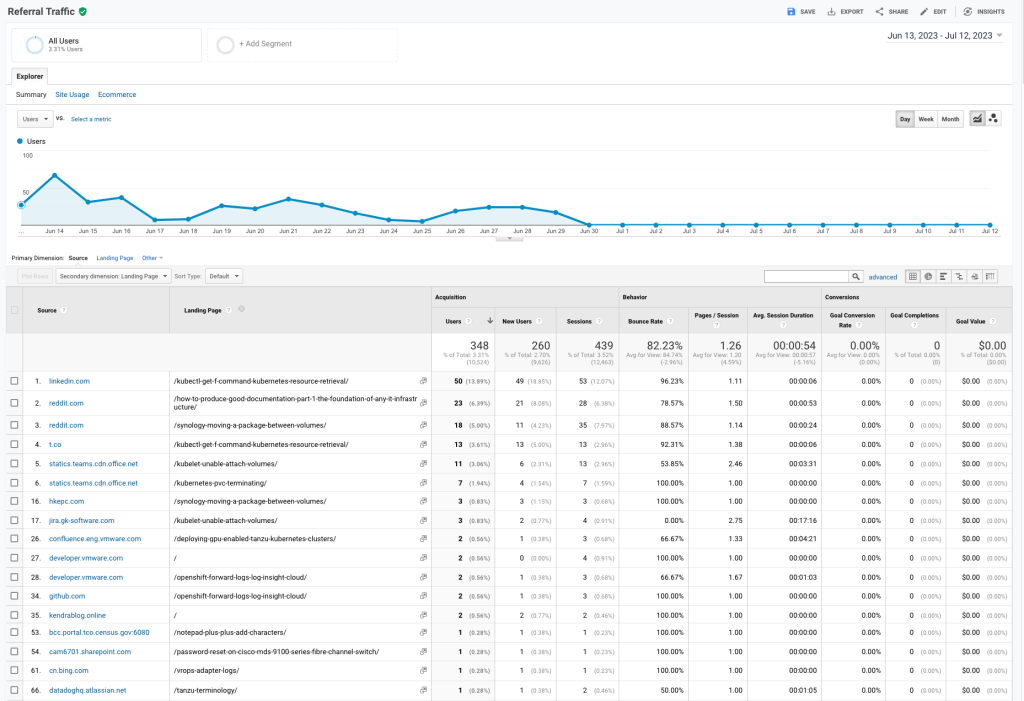
Below is an example from my UA screen, I could see the domains that users were hitting my site from. google analytics UA - referral example

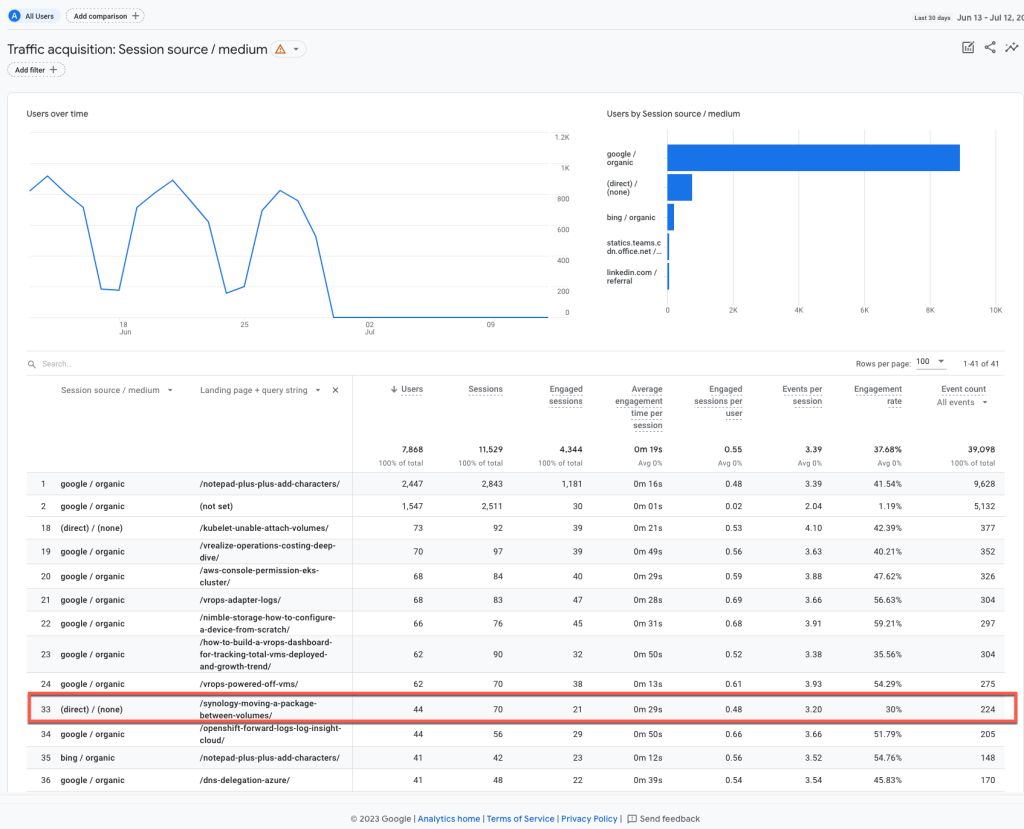
Using the traffic acqusition report in GA4, I couldn’t see the same information when selecting session source.

google analytics GA4 - referral example

The Cause

In the above screenshot, next to the report name you can see a little warning symbol. This is to tell me that thresholding has been applied, which stops me from identifying individual users.

This setting is caused by the google signals feature that was turned on as part of the migration to GA4, which is aimed at helping to identify more data about my visitors. But it’s something I don’t care about.

The Fix Continue reading Google Analytics GA4 – Fix Thresholding Applied and get granular refferal source data

VMware Fusion Header

Script to uninstall and cleanup VMware Fusion

The VMware Fusion KB to remove the software makes reference to a number of areas you need to manually cleanup, so below a little script which closes the application, uninstalls the app and removes the files.

Note: Uses sudo to elevate permissions for running the command.

To run the script:

chmod +x vmware_fusion_uninstall_and_cleanup.sh

# Adding sudo to the start of this command will bypass the need to provide further passwords as the script runs
sudo ./vmware_fusion_uninstall_and_cleanup.sh

Script Summary from ChatGPT – Because why not!

  • The provided script is a convenient and efficient way to uninstall VMware Fusion, a virtualization software, on macOS. It also performs a cleanup to remove related files and directories.
  • The script is designed to be executed in the Terminal, and it ensures elevated privileges (sudo) where necessary to perform system-level tasks.
  • The script starts by force killing VMware Fusion if it is running, ensuring a smooth uninstallation process.
  • Next, it moves the VMware Fusion application bundle from the /Applications folder to the Trash, effectively uninstalling the software.
  • The script then proceeds with the removal of various files and directories associated with VMware Fusion, cleaning up the system and freeing disk space.
  • The targeted files and directories include configuration files, caches, and preferences related to VMware Fusion.
  • Using a script for cleanup ensures that no traces of VMware Fusion are left behind, avoiding potential conflicts with other software or future installations.
  • However, users are advised to exercise caution when running scripts with sudo privileges, as it grants significant control over the system and can cause unintended consequences if used incorrectly.
  • A backup of important data is recommended before proceeding with the uninstallation and cleanup.
  • This script is suitable for users who want a streamlined and automated way to uninstall VMware Fusion and remove associated files on macOS.

Regards

Dean Lewis

Kubernetes

Kubernetes Metric Server – cannot validate certificate because it doesn’t contain any IP SANs

The Issue

Whilst trying to install the Metric’s server:

kubectl apply -f https://github.com/kubernetes-sigs/metrics-server/releases/latest/download/components.yaml

so I could use kubectl top node for it’s metrics on Node resource useage, I found the pods were not loading, and upon inspection found the following:

> kubectl logs -n kube-system metrics-server-6f6cdbf67d-v6sbf 

I0717 12:19:32.132722 1 server.go:187] "Failed probe" probe="metric-storage-ready" err="no metrics to serve"
E0717 12:19:39.159422 1 scraper.go:140] "Failed to scrape node" err="Get \"https://192.168.49.2:10250/metrics/resource\": x509: cannot validate certificate for 192.168.49.2 because it doesn't contain any IP SANs" node="minikube"

The Cause

The issue here was due to the installation of Cert-Manager and setting up some TLS configurations within the CNI and Self-Signed certificates, the metric’s server wasn’t able to validate the authority of the Kubernetes API

The Fix

As this is communication within the cluster, I could simply fix this by telling Metric Server container to trust the insecure certificates from the API using the below
kubectl patch command:

kubectl patch deployment metrics-server -n kube-system --type='json' -p='[{"op": "add", "path": "/spec/template/spec/containers/0/args/-", "value": "--kubelet-insecure-tls"}]'


Regards

Dean Lewis

Kubernetes

Quick Tip: Supercharge Kubernetes Resource Retrieval with ‘kubectl get -f’

Did you know you can use the -f argument with kubectl get? Yep me either.

It’s pretty handy actually, as it will provide the status for all your Kubernetes resources deployed using that file or even file from hyperlink!

Below is a screenshot example using a file.

kubectl get -f

You can also specify multiple files by adding -f {file}for each file you want to check (this also works when deploying resources too!).

kubect get -f multiple files

And another example, using a hyperlink as the file location.

kubectl get -f from url

Hope this little tip helps someone!

Just for fun, here’s the ChatGPT write-up!

The command “kubectl get -f” is used in Kubernetes to retrieve information about Kubernetes resources defined in a file or multiple files. Let’s break down the command and its components:

  • “kubectl”: It is the command-line interface (CLI) tool for interacting with Kubernetes clusters. It allows you to manage and control Kubernetes resources.
  • “get”: It is the action or subcommand used to retrieve information about Kubernetes resources.
  • “-f”: It is a flag that specifies that the input will be provided from a file or multiple files rather than directly on the command line. It is followed by the path to the file(s) containing the Kubernetes resource definitions.

When you use “kubectl get -f <file>”, Kubernetes reads the file(s) provided and retrieves the information about the resources defined within those files. The information can include the names, statuses, and other details of the resources.

For example, if you have a file named “deployment.yaml” that defines a Kubernetes Deployment resource, you can use the command “kubectl get -f deployment.yaml” to retrieve information about that specific Deployment resource.

You can also provide multiple files by separating them with commas or specifying a directory containing multiple resource files. For instance, “kubectl get -f file1.yaml,file2.yaml” or “kubectl get -f /path/to/files” (where /path/to/files is the directory path).

By using this command, you can quickly retrieve information about Kubernetes resources defined in files without needing to manually create or modify resources using the command line.

Regards

Dean Lewis

Red Hat OpenShift Header

Red Hat OpenShift – Sorry, your reply was invalid: IP expected to be in one of the machine networks

The Issue

When running the command:

openshift-install create cluster

And you provide an API IP address which is not in the CIDR range 10.0.0.0/16, you recieve the below error.

INFO Defaulting to only available network: VM Network 
X Sorry, your reply was invalid: IP expected to be in one of the machine networks: 10.0.0.0/16
? The VIP to be used for the OpenShift API.
OpenShift-Install create cluster - Sorry, your reply was invalid- IP expected to be in one of the machine networks- 10.0.0.0-16
The Cause

This is a known bug in the openshift-install tool (GitHub PR,Red Hat Article), where by the software installer is hardcoded to only accept addresses in the 10.0.0.0/16 range.

The Fix

The current work around for this is to run openshift-install create install-config provide ip addresses in the 10.0.0.0/16 range, and then alter the install-config.yaml file manually before running openshift-install create cluster, which will read the available install-config.yaml file and create the cluster (rather than presenting you another wizard).

In the wizard (below screenshot), I’ve provided IP’s on the range from above, and set my base domain and cluster name as well. The final piece is to paste in my Pull Secret from the Red Hat Cloud console.

OpenShift-install create install-config

Now if I run ls on my current directory I’ll see the install-config.yaml file. It is recommended to save this file now before you run the create cluster command, as this file will be removed after this, as it contains plain text passwords.

I’ve highlighted in the below image the lines we need to alter.
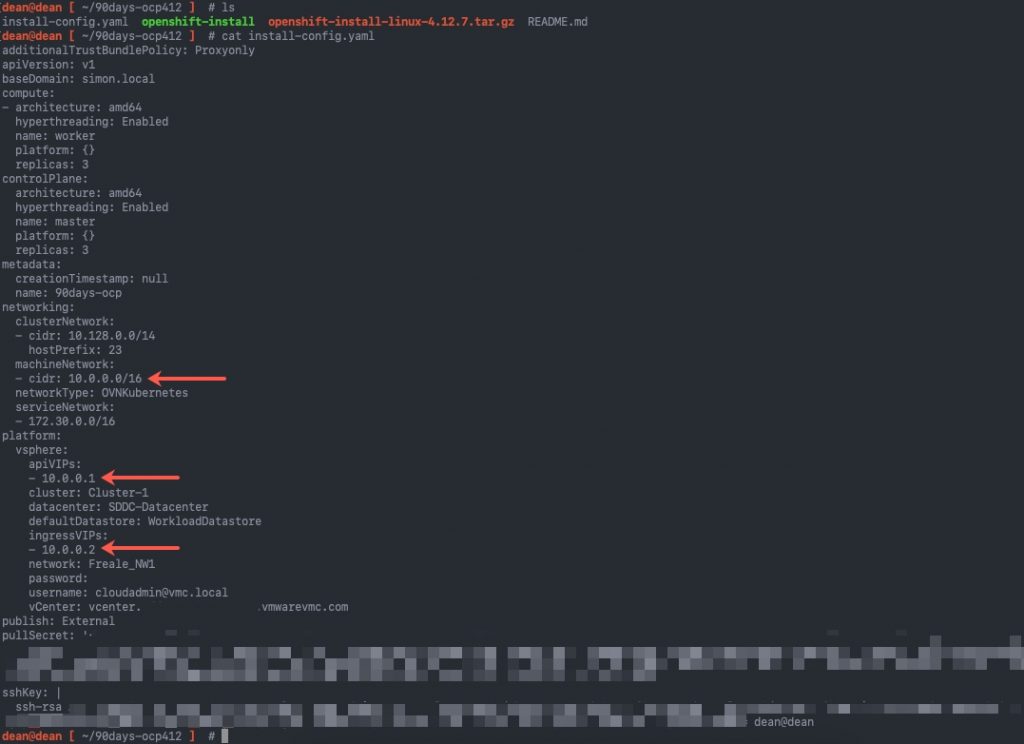
OpenShift install install config.yaml file

For the section:

machineNetwork: - cidr: 10.0.0.0/16

This needs to be changed to the network subnet the nodes will run on. And for the platform section, you need to map the right IP addresses from your DNS records.

platform:
  vsphere:
    apiVIP: 192.168.200.192 <<<<<<< This is your api.{cluster_name}.{base_domain} DNS record
    cluster: Cluster-1
    folder: /vEducate-DC/vm/OpenShift/
    datacenter: vEducate-DC
    defaultDatastore: Datastore01
    ingressVIP: 192.168.200.193 <<<<<<< This is your *.apps.{cluster_name}.{base_domain} DNS record

Now that we have our correctly configured install-config.yaml file, we can proceed with the installation of the cluster, which after running the openshift-install create cluster command, is hands off from this point forward. The system will output logging to the console for you, which you can modify using the --log-level= argument at the end of the command.

Regards

Dean Lewis